G GCSE Apps

GCSE Geometry

Constructions And Loci

4 subtopics in this section

Constructing triangles

Definition

Triangles can be constructed using ruler and compass to measure and draw the sides and a protractor to measure angles.

To construct a unique triangle, you need certain pieces of information. For example, if you're only told the sizes of the three angles, it's impossible to construct a unique triangle as there's no information about the lengths of any sides.

The criteria that are sufficient are: The lengths of all three sides. The measure of two angles and the side inbetween. The lengths of two sides and the angle inbetween.

Method

Here are the three methods for constructing triangles given each set of information.

Side Side Side

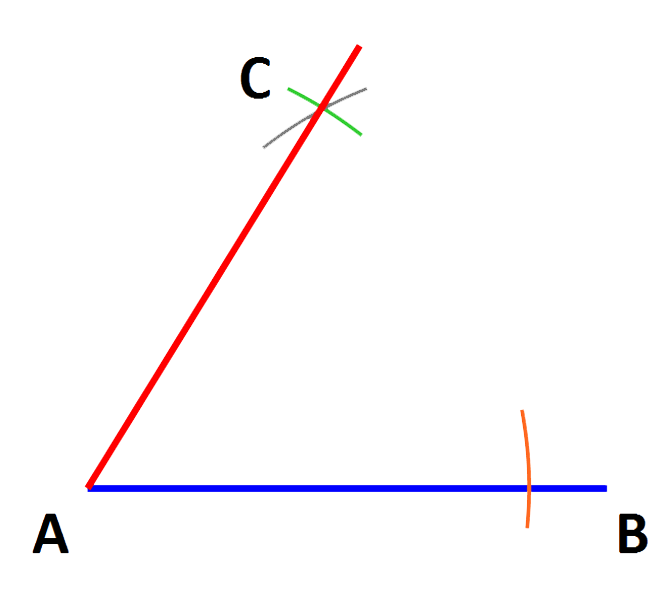
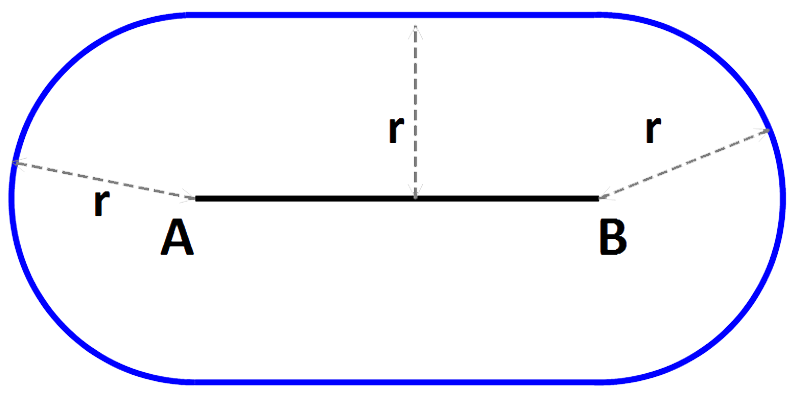
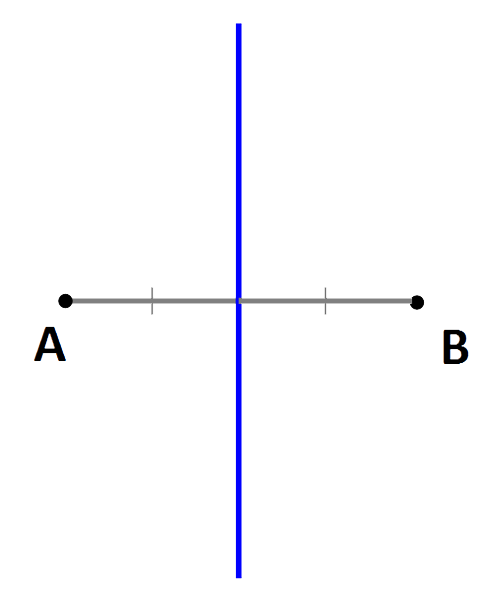
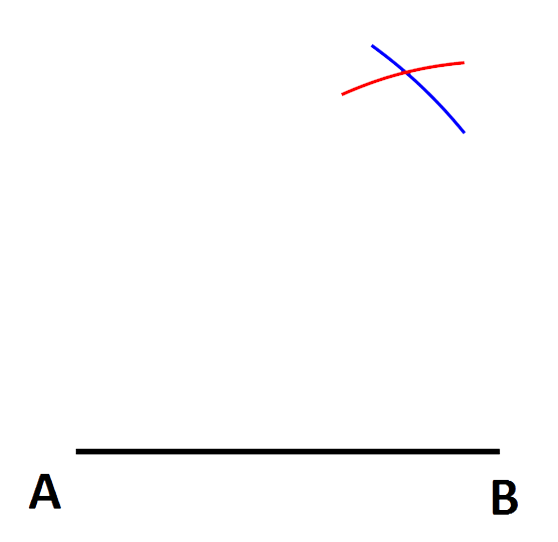
Draw one side as a base using a ruler to measure it. Let this side be AB (black).

Diagram

constructing triangles def 1

Note

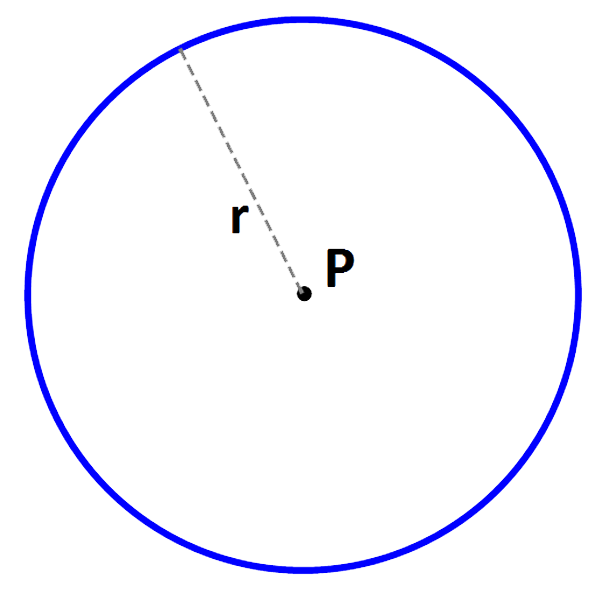
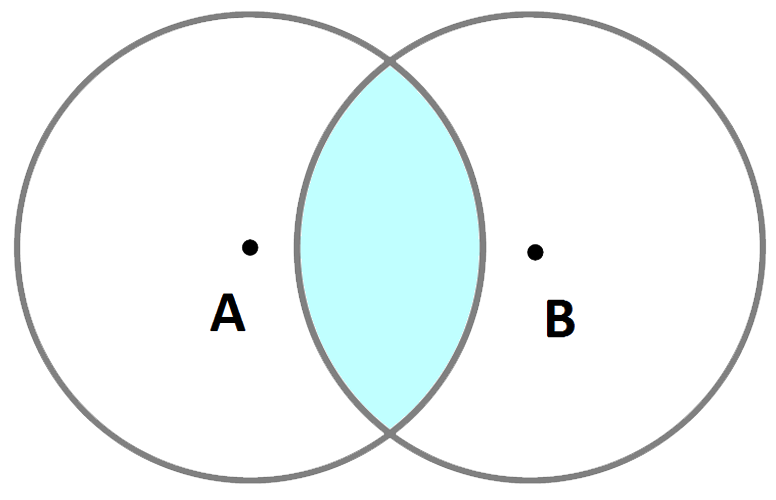
Measure one of the other side's distances with your compass, place the point at A and draw an arc (blue). Repeat the process with the remaining side and the compass point at B to draw a second arc (red

Diagram

constructing triangles def 2

Note

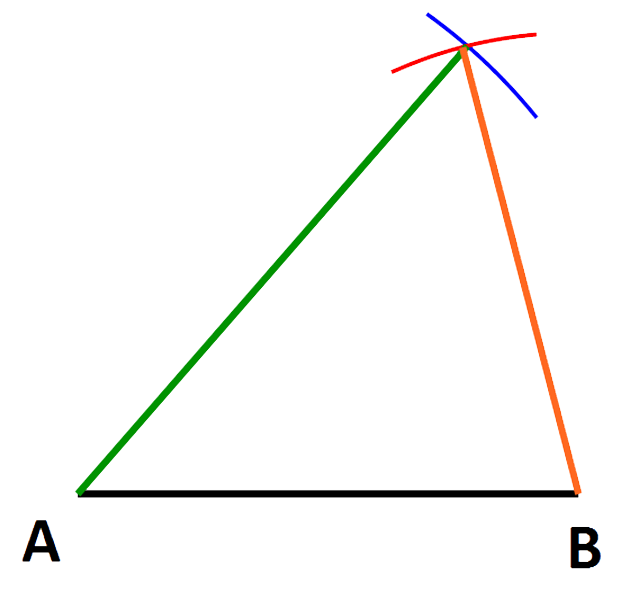
Draw lines from A (green) and B (orange) to the intersection of the arcs. This completes the triangle.
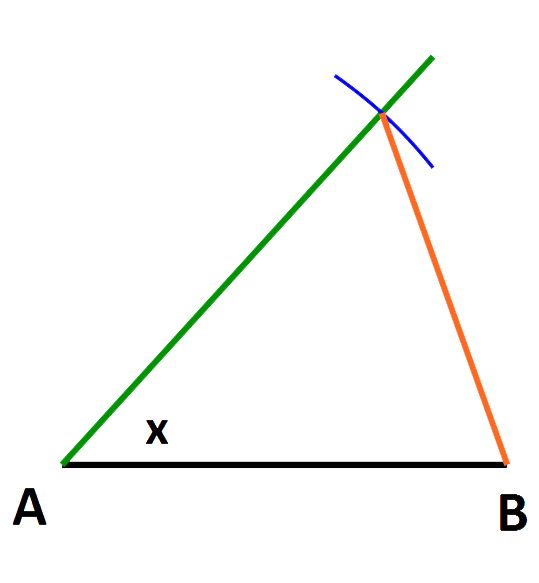
Angle Side Angle

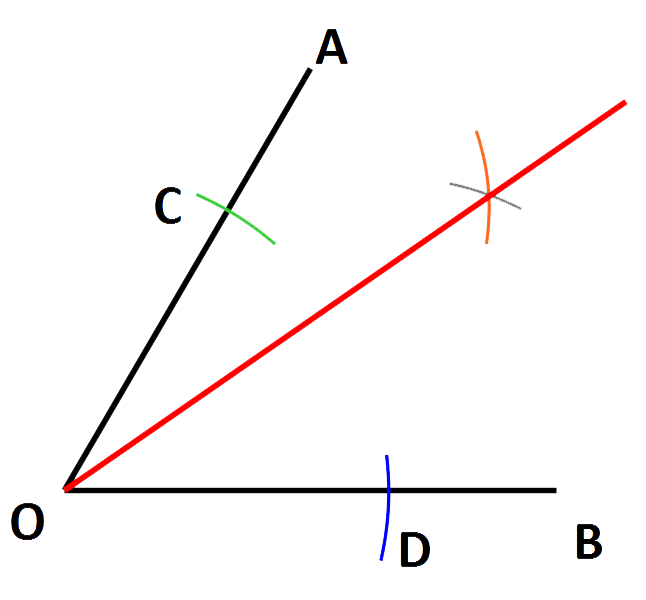
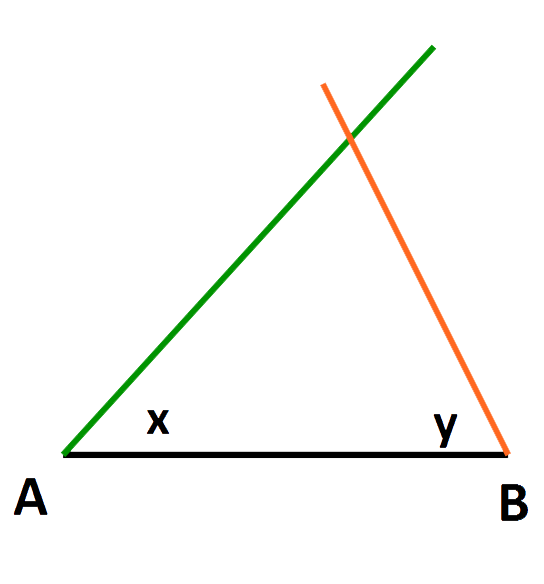
Use a ruler to draw the side you've been given, AB (black) At A, measure one of the angles, x, and draw a good length line (green) at that angle. Repeat the process at B with the other angle, y to draw the third line (orange) of the triangle.

Diagram

constructing triangles def 3

Side Angle Side

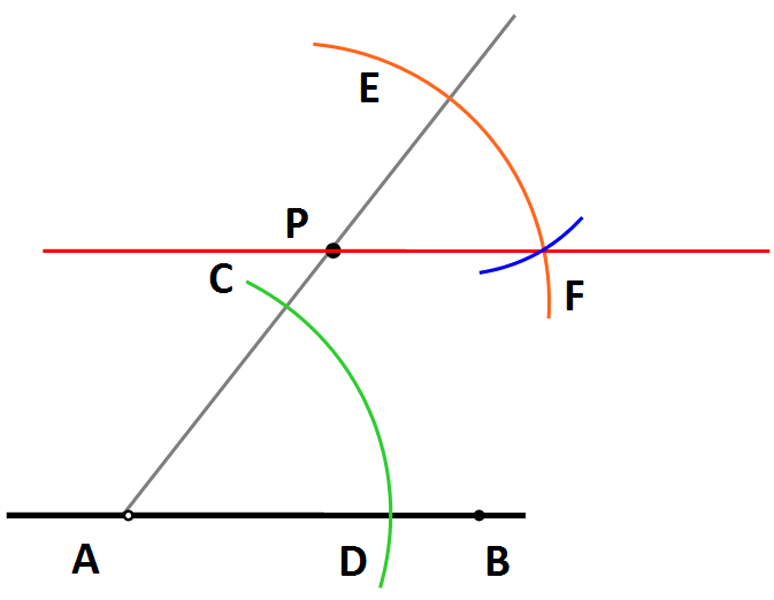
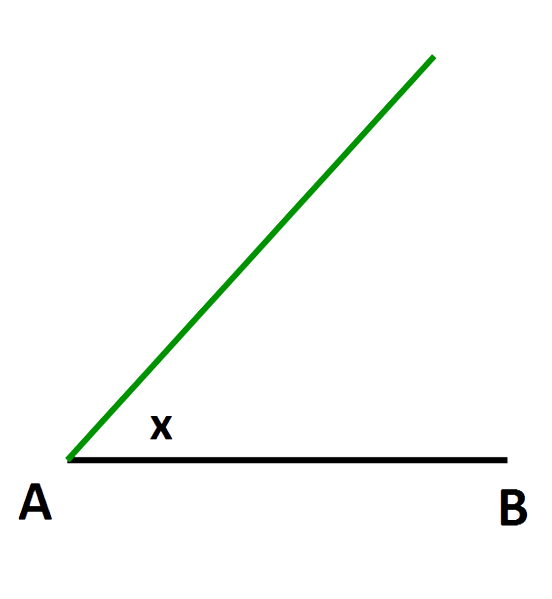
Draw one of the sides, AB, as the base (black) Use a protractor to measure the given angle, x, at A. Draw a good length line at this angle (green)

Diagram

constructing triangles def 4

Note

Now set your compass to the length of the second given side. Place the compass point at A and mark an arc (blue) along the angled line. Join the intersection of the arc and the line to B for the third line (orange) of the triangle.

Diagram

constructing triangles def 5

Example

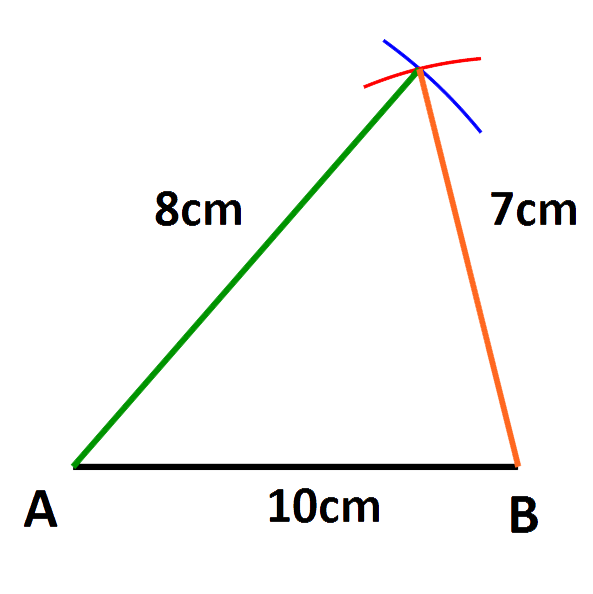
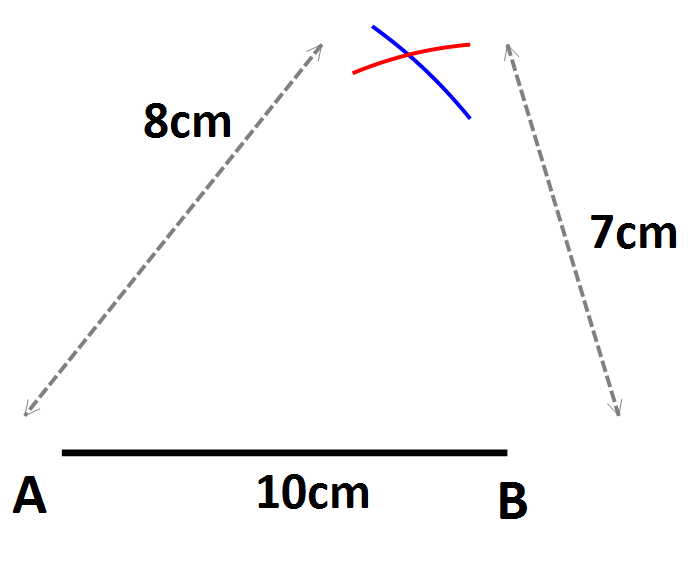
Using ruler and compass only, construct a triangle with sides 7cm, 8cm and 10cm.

Solution

Draw the base, AB, of 10cm. Set your compass to 8cm, place the point at A and mark an arc (blue). Now set it to 7cm, place the point at B and mark an arc (red).

Diagram

constructing triangles sol

Note

Then draw lines between A and B to the point of intersection of the arcs to complete the triangle.

Diagram

constructing triangles sol 2

Constructing angles and perpendiculars

Definition

There are a number of angles that can be constructed using ruler and compass alone.

Angle of 60°

Draw a horizontal line (blue) AB.

Diagram

60 degree construction explanation

Note

Set your compass to a reasonable measure (less than the length of AB). Place the point at A and mark an arc (orange) on the line and one (green) above the line, about halfway between the compass point and the first arc. Now, without adjusting the measure of the compass, place the point of it where the orange arc crosses the blue line and mark an arc (grey) through the green one. Now draw a line (red) from A to the point (C) where the grey and green arcs cross. The angle at A is 60°

Perpendicular from a point on a line

Let the line (black) be AB and the point P

Note

perpendicular from a point on a line explanation

Set your compass to a reasonable measure. Place the point at P and mark an arc (orange) on either side of P. Call these points C, D. Place your compass at C and mark an arc (green) above and an arc below P Do the same from point D marking two arcs (blue) above and below P. Draw a line (red) from the intersection of the arcs above P, through P to the intersection of the arcs below P. This line is perpendicular to AB

Perpendicular from a point to a line

Let the line be AB (black) and the point P

Note

perpendicular from a point to a line explanation

Set your compass measure so that it will reach from P to AB. Mark two arcs on the line (orange). Let these points be C, D Now place the compass at C and mark an arc below the line and below P (green). Do the same from the point D marking the blue arc. Now draw a line (red) from P to the intersection of the blue and green arcs. This line is perpendicular to AB

Angle Bisector

Let the angle be as shown, ∠AOB

Diagram

angle bisector explanation

Note

Put your compass point at O and mark an arc (green) on OA and one (blue) on OB. Let the intersection points be C, D respectively Now place the compass point at C and mark an arc (orange) about halfway between OA and OB. Similarly place the compass point at D and mark an arc (grey) about halfway between OA and OB. Draw a line (red) from O to the intersection of the orange and grey arcs. This line bisects ∠AOB

Parallel Line through a Given Point

You're given a line AB (black), and a point P off the line and asked to construct a line parallel to AB which passes through P

Diagram

parallel line construction explanation

Note

Draw a line (grey) from P to A and extending beyond P Set your compass to a width less than AP, place the point on A and mark an arc (green) that passes through AP (at C) and AB (at D). Keeping the same compass measure, place the point at C and mark a large arc (orange) through the extended line AP. Let it cross AP at E. Now set your compass width to be CD Place the point at E and mark an arc (blue) to pass through the orange one at point F. The line PF is parallel to AB Phew!

Other angles

To construct an angle of 30°, construct one of 60° and then bisect it.

Similarly, to construct an angle of 45°, construct a perpendicular to a line and then bisect the 90° angle.

Tips/hints

The key thing is to show ALL your markings. Pivoting your ruler at a point and sweeping round is NOT an option. Use your compass and draw the arc

Example

Construct an angle of 15° to the horizontal.

Solution

Construct an angle of 60° (as outlined above)

Bisect it (as outlined above)

You now have two angles of 30°.

Bisect one of these for an angle of 15°

Loci

Definition

A Locus is a set of points a line, curve or area that fit a given rule.

There are a number of standard Loci (plural of Locus) that you need to know.

A Fixed Distance from a Given Point

This is a Circle whose centre is P, the Given Point and whose radius is r, the Fixed Distance.

Diagram

circle locus

A Fixed Distance from a Given Line

Think of this as a Stretch Circle - like a stretch limo, only a circle. Let the Given Line be AB and the Fixed Distance r.

Diagram

stretch circle locus

Note

The locus is actually two lines parallel to, either side of and the same length as AB. They are a distance of r from AB. At either end is a semi-circle, radius r.

Equidistant from Two Given Lines

If the lines are parallel, the Locus is a third parallel line inbetween the two given ones.

Diagram

third parallel line locus

Note

If they're not parallel, then they must intersect and the Locus is the bisector of their angle of intersection.

Diagram

angle bisector locus

Equidistant from Two Given Points

Let the points be A,B. The Locus is the perpendicular bisector of the line AB

Diagram

perpendicular bisector locus

Method

Learn the four loci above. Also, think about the sets of points that are 'less than' or 'greater than'. For example, the locus of the set of points that are less than r from a given point P is the area inside a circle, whose centre is P and whose radius is r.

Example

In the diagram below are two identical circles, radius 5cm, centres A and B. Describe the set of points whose locus is the shaded blue area.

Diagram

loci ex

Solution

Now, the area inside the circle centre A is the locus of the set of points M such that AM < 5cm. Similarly, the area inside the other circle is the set of points N such that BN < 5cm. So, any point, Q, in the shaded area must be such that AQ < 5cm, BQ < 5cm. Putting that into words... The shaded blue area is the set of points that lie less than 5cm from A and less than 5cm from B

Real life loci problems

Definition

Loci have many applications in the real world: navigational systems, ranges of transmitters, boundaries and so on.

Method

Be familiar with all the different types of locus in the module Loci. If in doubt, draw a diagram.

Example

A farmer has bought an automatic muck spreader. It is to be situated in the middle of a field where it rotates shooting muck out to a maximum distance of 30m. The farmer wants to use it to cover a square field in muck. What is the maximum length of the side of a field that can be covered? Leave your answer in surd form.

Solution

The locus of the area that can be covered is a circle radius 30m

Diagram

muck locus

Note

Now, if the farmer wants the whole of a square field to be covered, that whole field must fit inside a circle radius 30m ie. inside a circle diameter 60m

Diagram

muck locus 2

Note

To maximise the square, the diagonal must be 60m, the diameter of the circle. Let the side of the square be S. Using Pythagoras' theorem, S² + S² = 60² 2S² = 3600 S = √1800 = 10√18 = 30√2 m

So, the maximum dimensions of the field are 30√2m x 30√2m

Test yourself on this topic

Try the free quiz with worked solutions.

Start quiz →

Get GCSE Geometry

Full notes, full question bank, offline.